MoPi: Mobile Power for the Pi
Hot-swap Mobile Power for the Pi
**** Please don't link or distribute this page ****
Hamish Cunningham December 2013-January 2014
Contents
- 1. Pi to Go!
- 1.1. I Want One!
- 2. The Story So Far
- 2.1. The Perfect Pack
- 2.2. The Prototypes
- 2.3. A Longer-Lasting Snack
- 3. The Future: Development Schedule
- 3.1. Power to the People
- 3.2. Experimenter Kits for Schools and Outdoor Adventurers
- 3.2.1. Outdoor Adventure Kit
- 3.2.2. Outdoor Experimenter Kit (Light)
- 3.2.3. Outdoor Experimenter Kit (Light and Air)
- 3.2.4. How Kickstarter Will Help
- 3.2.5. Production and Fulfillment Plan
- 4. How MoPi Works
- 4.1. Monitoring
- 4.1.1. SimBaMon: a Simple Battery Monitor daemon
- 4.1.1.1. Installing SimBaMon
- 4.2. The Hardware
- 5. Stretch Goals
1. Pi to Go!
MoPi is mobile and 24/7 power for the Pi. On your bike, up a tree, or for your home server: we've got you covered.
Features:
- multiple inputs — standard batteries, car power sockets, old laptop supplies, solar panels, ...
- hot-swap power replacement without stopping work
- shutdown the Pi cleanly when batteries discharge
- integrated on/off switch
- UPS (uninterruptible power) when using both batteries and mains
- on-board LED indicators and on-Pi notifications
And it even fits in the Pibow (and other well-known Pi cases):
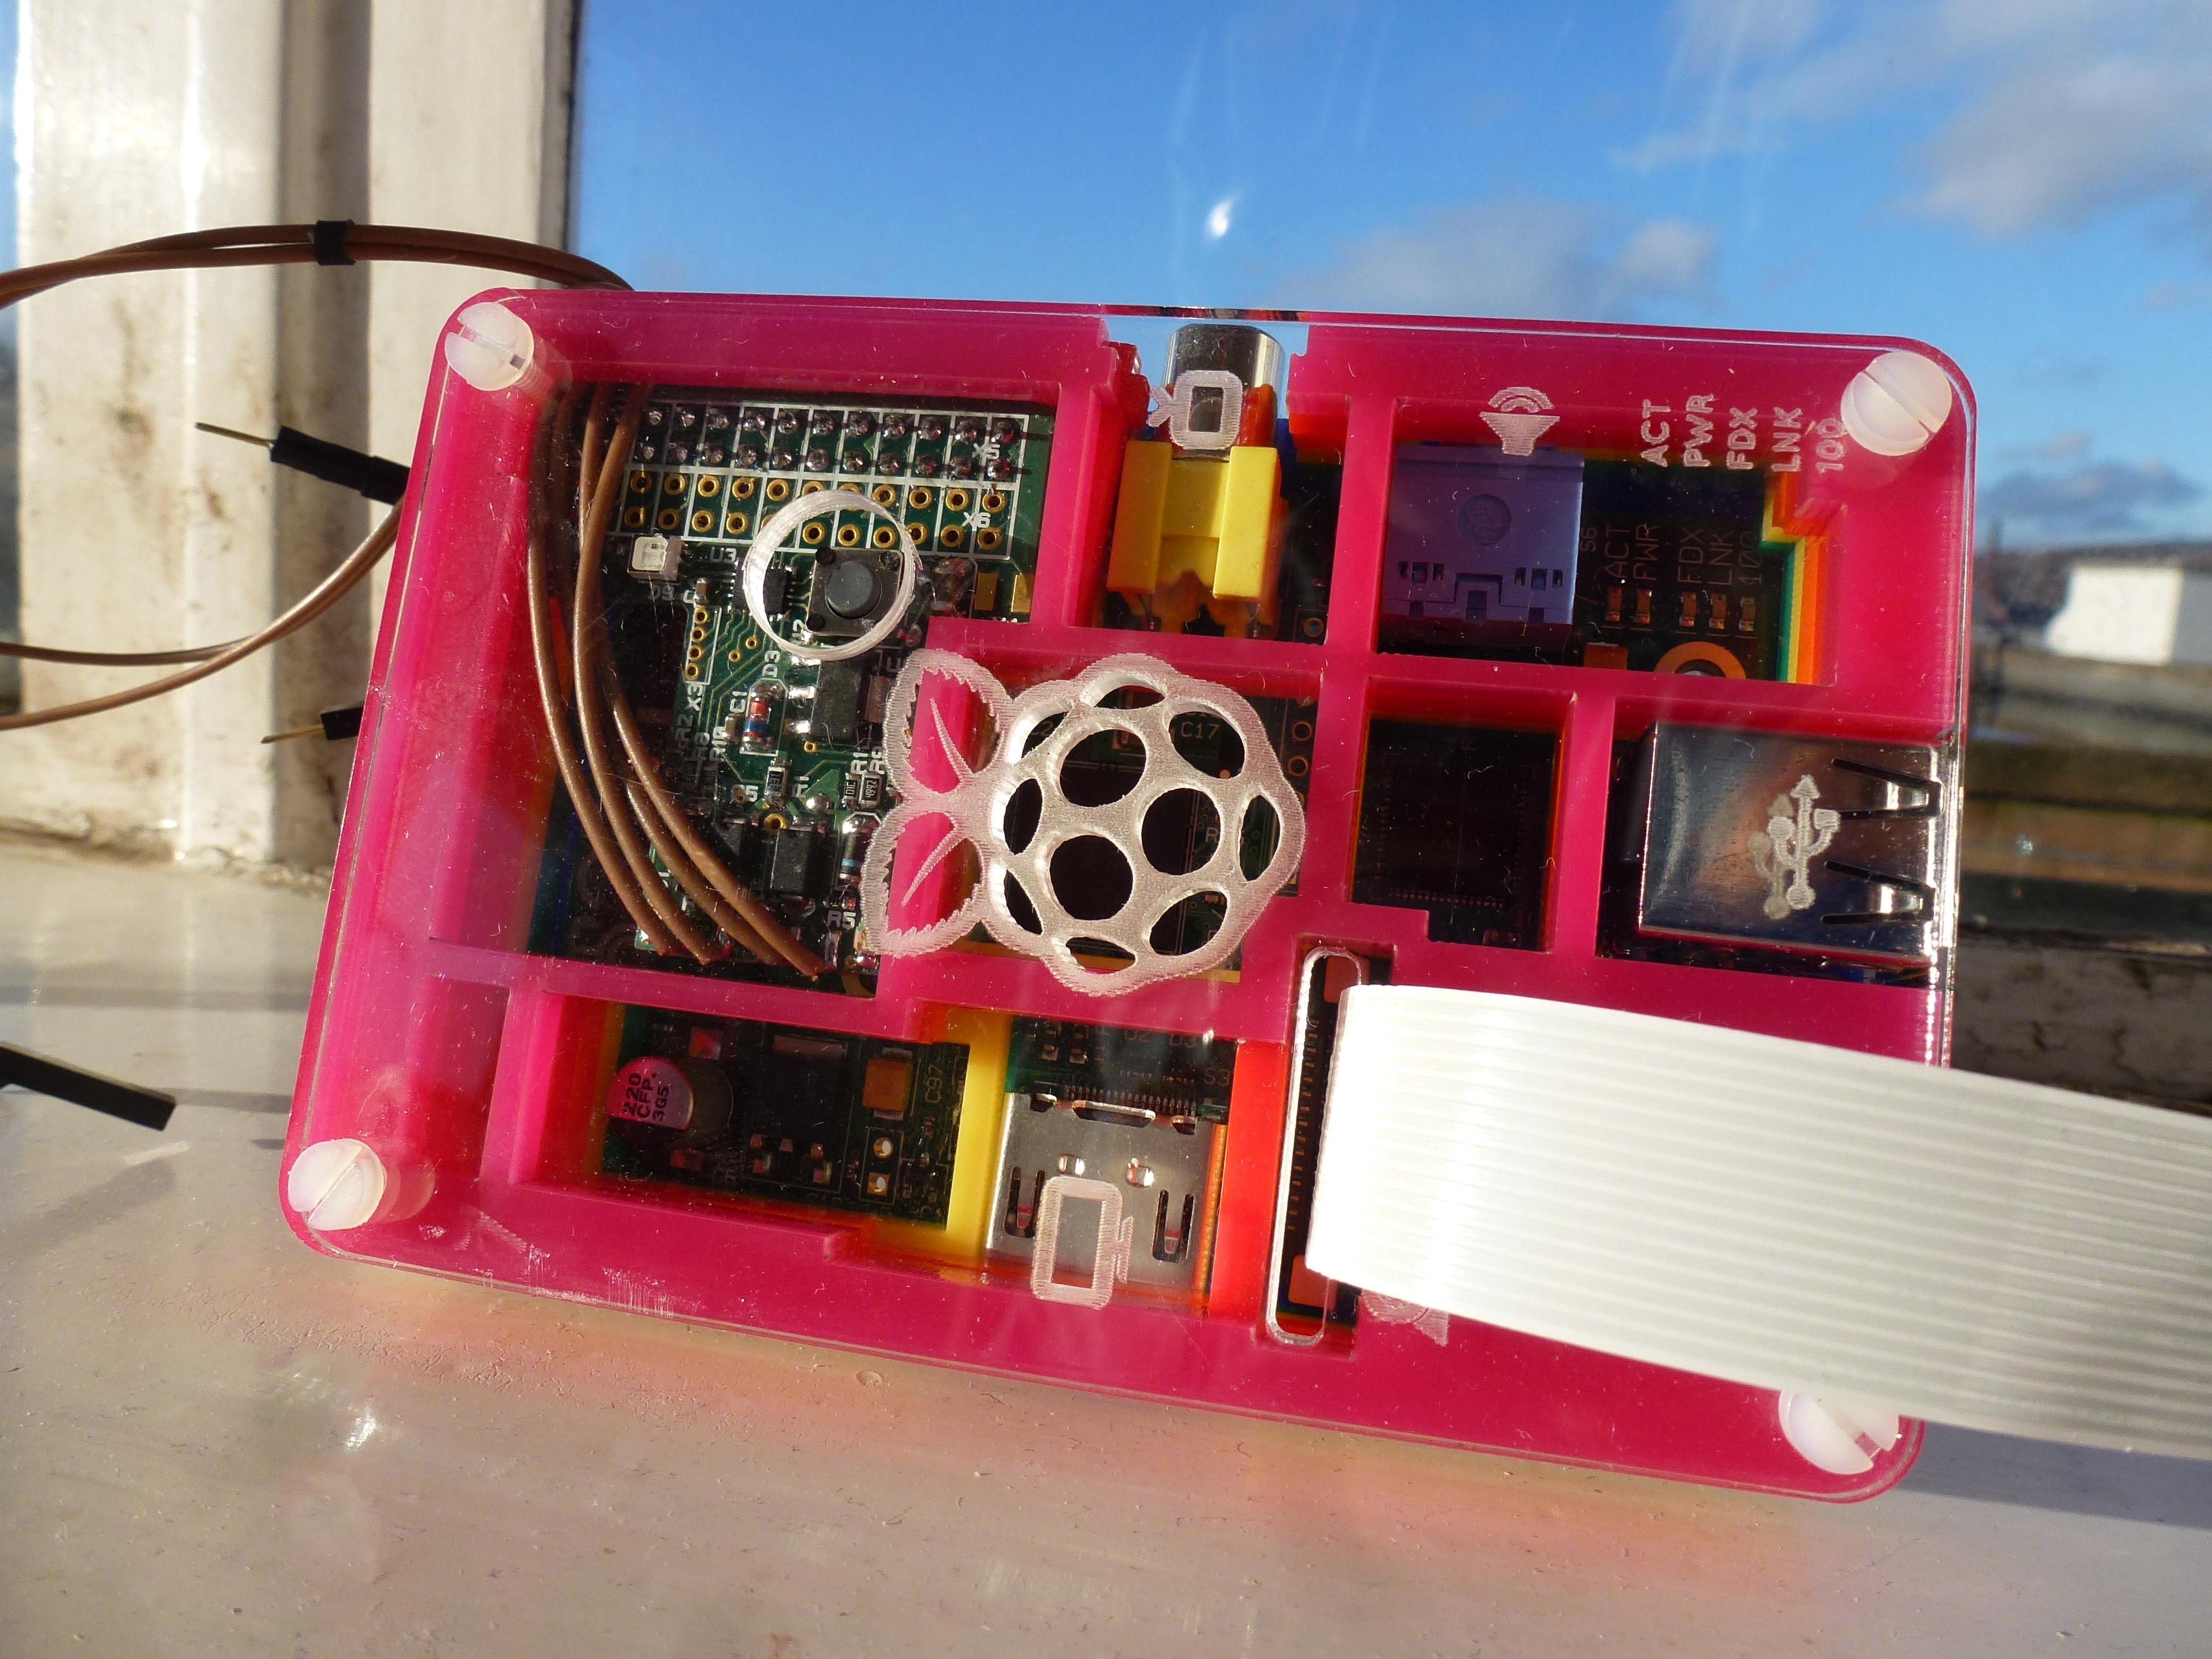
Back this Kickstarter from less than £20/€25/$30 (early bird) and we'll have you powered up in no time. Or pick up one of our outdoor experimenter kits and help us deliver field-trip science rigs for schools. (Add £2.25 to any reward and get a custom Pibow lid!)
Where do you want to use yours?!
1.1. I Want One!
Great! Click on one of the pledges listed to the right of the page.
The options:
- Just MoPi: pledge £18 (early bird) or £24.
- MoPi, rechargeable batteries and charger: pledge £48 (early bird) or £59.
- Don't interrupt! The cheapest UPS on the market: pledge £75 (early bird) or £89.
- Kit and caboodle:
- for Pi-on-the-Road Adventurers kit pledge £130
- for Outdoor Experimenters (Light) pledge £157
- for Outdoor Experimenters (Light and Air) pledge £239
- Make me a lab:
- an outdoor rig for 10-pupil classes is £2,140
- for an on-site workshop pledge £3,340.
- Or, just pledge £2 and we'll keep you in touch.
- And add £2.25 to any pledge and we'll upgrade your Pibow case with a custom MoPi-friendly lid.
Payment by barter, bitcoin, or bourbon biscuits in bulk: probably fine, but phone first!
2. The Story So Far
NOTE: video 2 goes here...
About a year ago we realised that we needed better power management for our mobile projects on Pi.GATE.ac.uk. Five volt USB battery packs are common, but none of them can communicate their level of charge to the Pi. That means lots of unanticipated power cuts — a good way to corrupt your SD card :-(
And then we realised that standard rechargeables are more planet friendly. And then that it would be cool to be able to hot-swap supplies, and that if we could do that then why not make it a UPS too, and how about adding a power switch, and...
Fast forward: we're onto our third prototype and we think we know what perfect Pi power looks like. Read on!
2.1. The Perfect Pack
What would the perfect Pi battery pack look like? It should be:
Low cost. Dedicated battery supplies like those sold as phone charging devices are great, but when they no longer hold charge the whole unit has to be recycled. Standard commodity batteries and the reusable chargers that serve them are well-established and already present in many households. They're the cheapest and most flexible option.
Flexible. Got a solar panel handy? I want to plug it into the circuitry and have it drive the Pi as long as the sun shines, then let a battery take over when the clouds come. Stuck for power but got an old laptop supply or 12 volt car charger handy? Strip the cables, connect, and power my Pi please! Plugging a bunch of peripherals? I want to be able to drive them all via my battery pack. And etc.
Polite. When you're running your laptop on battery and it runs out of juice it gives you a nice polite warning message or two, and, when the level gets really low, it automagically shuts down the machine. This is important to allow the operating system (e.g. Raspbian Linux on the Pi) to close up any open files and generally tidy the house before power disappears. Just killing the power without warning is risky — sometimes nothing bad happens, but in the worst case you can end up with a machine that won't boot and needs a complete reinstall. So I want my battery pack to signal the Pi when levels are low, so that the Pi can shut itself down cleanly. Good manners are important, after all :-)
And if the battery pack is going to tell the Pi when it is getting low and needs to shut down, why not have an on/off switch into the bargain? The "off" signal triggers clean shutdown, and is very convenient when you're using the Pi in any kind of kiosk or appliance context. Several projects have implemented this type of on/off facility in its own right — e.g. the ATX Pi supply or the PIC controller — it's definitely a useful function to have on board.
Uninterruptible. I don't want to stop work when my battery is low if I've got a charged pack handy (or a different source of power, like a car cigarette lighter socket or the like). So I'd like my battery pack to support hot-swap of a new electricity supply, either a new set of batteries or some other new input.
Eco-friendly. One of the great things about the Pi is its low carbon footprint. The recent ones in my lab are made in Wales, so they haven't travelled half way around the world to reach me. The base system is bare-bones, which encourages reuse of power supplies, monitors, cables and the like. The power consumption is low — particularly for the Model A, which gets by on 300 mA or below (at 5 volts this adds up to around 1.5 watts — contrast that with 50 watts and above for a desktop PC!). There's no spare planet; there's no Plan B if we destroy this one. So we definitely want to support rechargeable batteries, and preferably not the built-in variety that are hard to recycle.
Communicative. I want to know when the battery is full, when it is starting to get low and when it is critical. I want to be able to get those signals both when logged in to the Pi and visually from the battery pack itself. (Look! Flashing lights!)
Robust. I'm pretty unreliable at the best of times. When crawling through the underbrush with a camera-equiped Pi rig in search of Pine Marten lairs I'm very likely to plug the wrong end of the stick and end up with my foot in my mouth, to coin a mixed metaphor or three. Over-volt and spike protection are definitely requirements.
2.2. The Prototypes
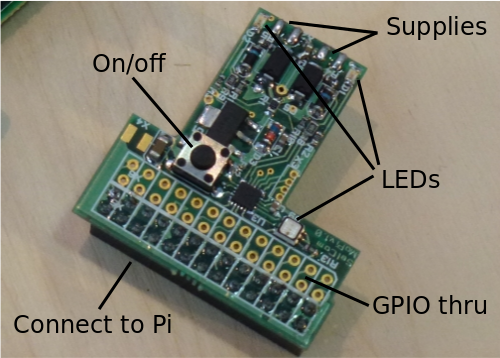
We're now working on our third-generation prototype, which will be the final test board before we start volume production — see the development schedule below. This was the second-generation prototype:
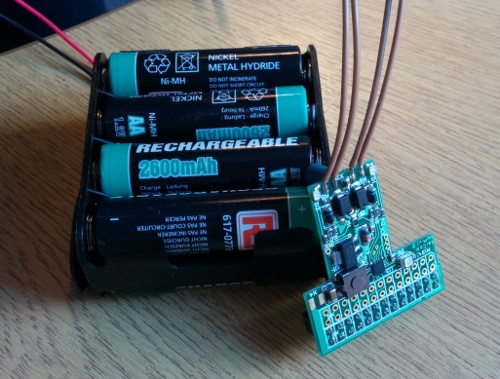
The shape of the PCB allows it to fit into the Pibow without blocking the Pi's display output (currently unused but on the list for future development at The Foundation). There's space for a pass-through GPIO header so that other add-on boards can share space on the Pi, separate LEDs for overall function and for the two power inputs, and a neat little power switch on the top.
(The good people at Pimoroni are going to do a custom lid for their Pibow case to give access to MoPi's power switch. We'll also supply templates if you need to drill out an existing Pibow or other popular case.)
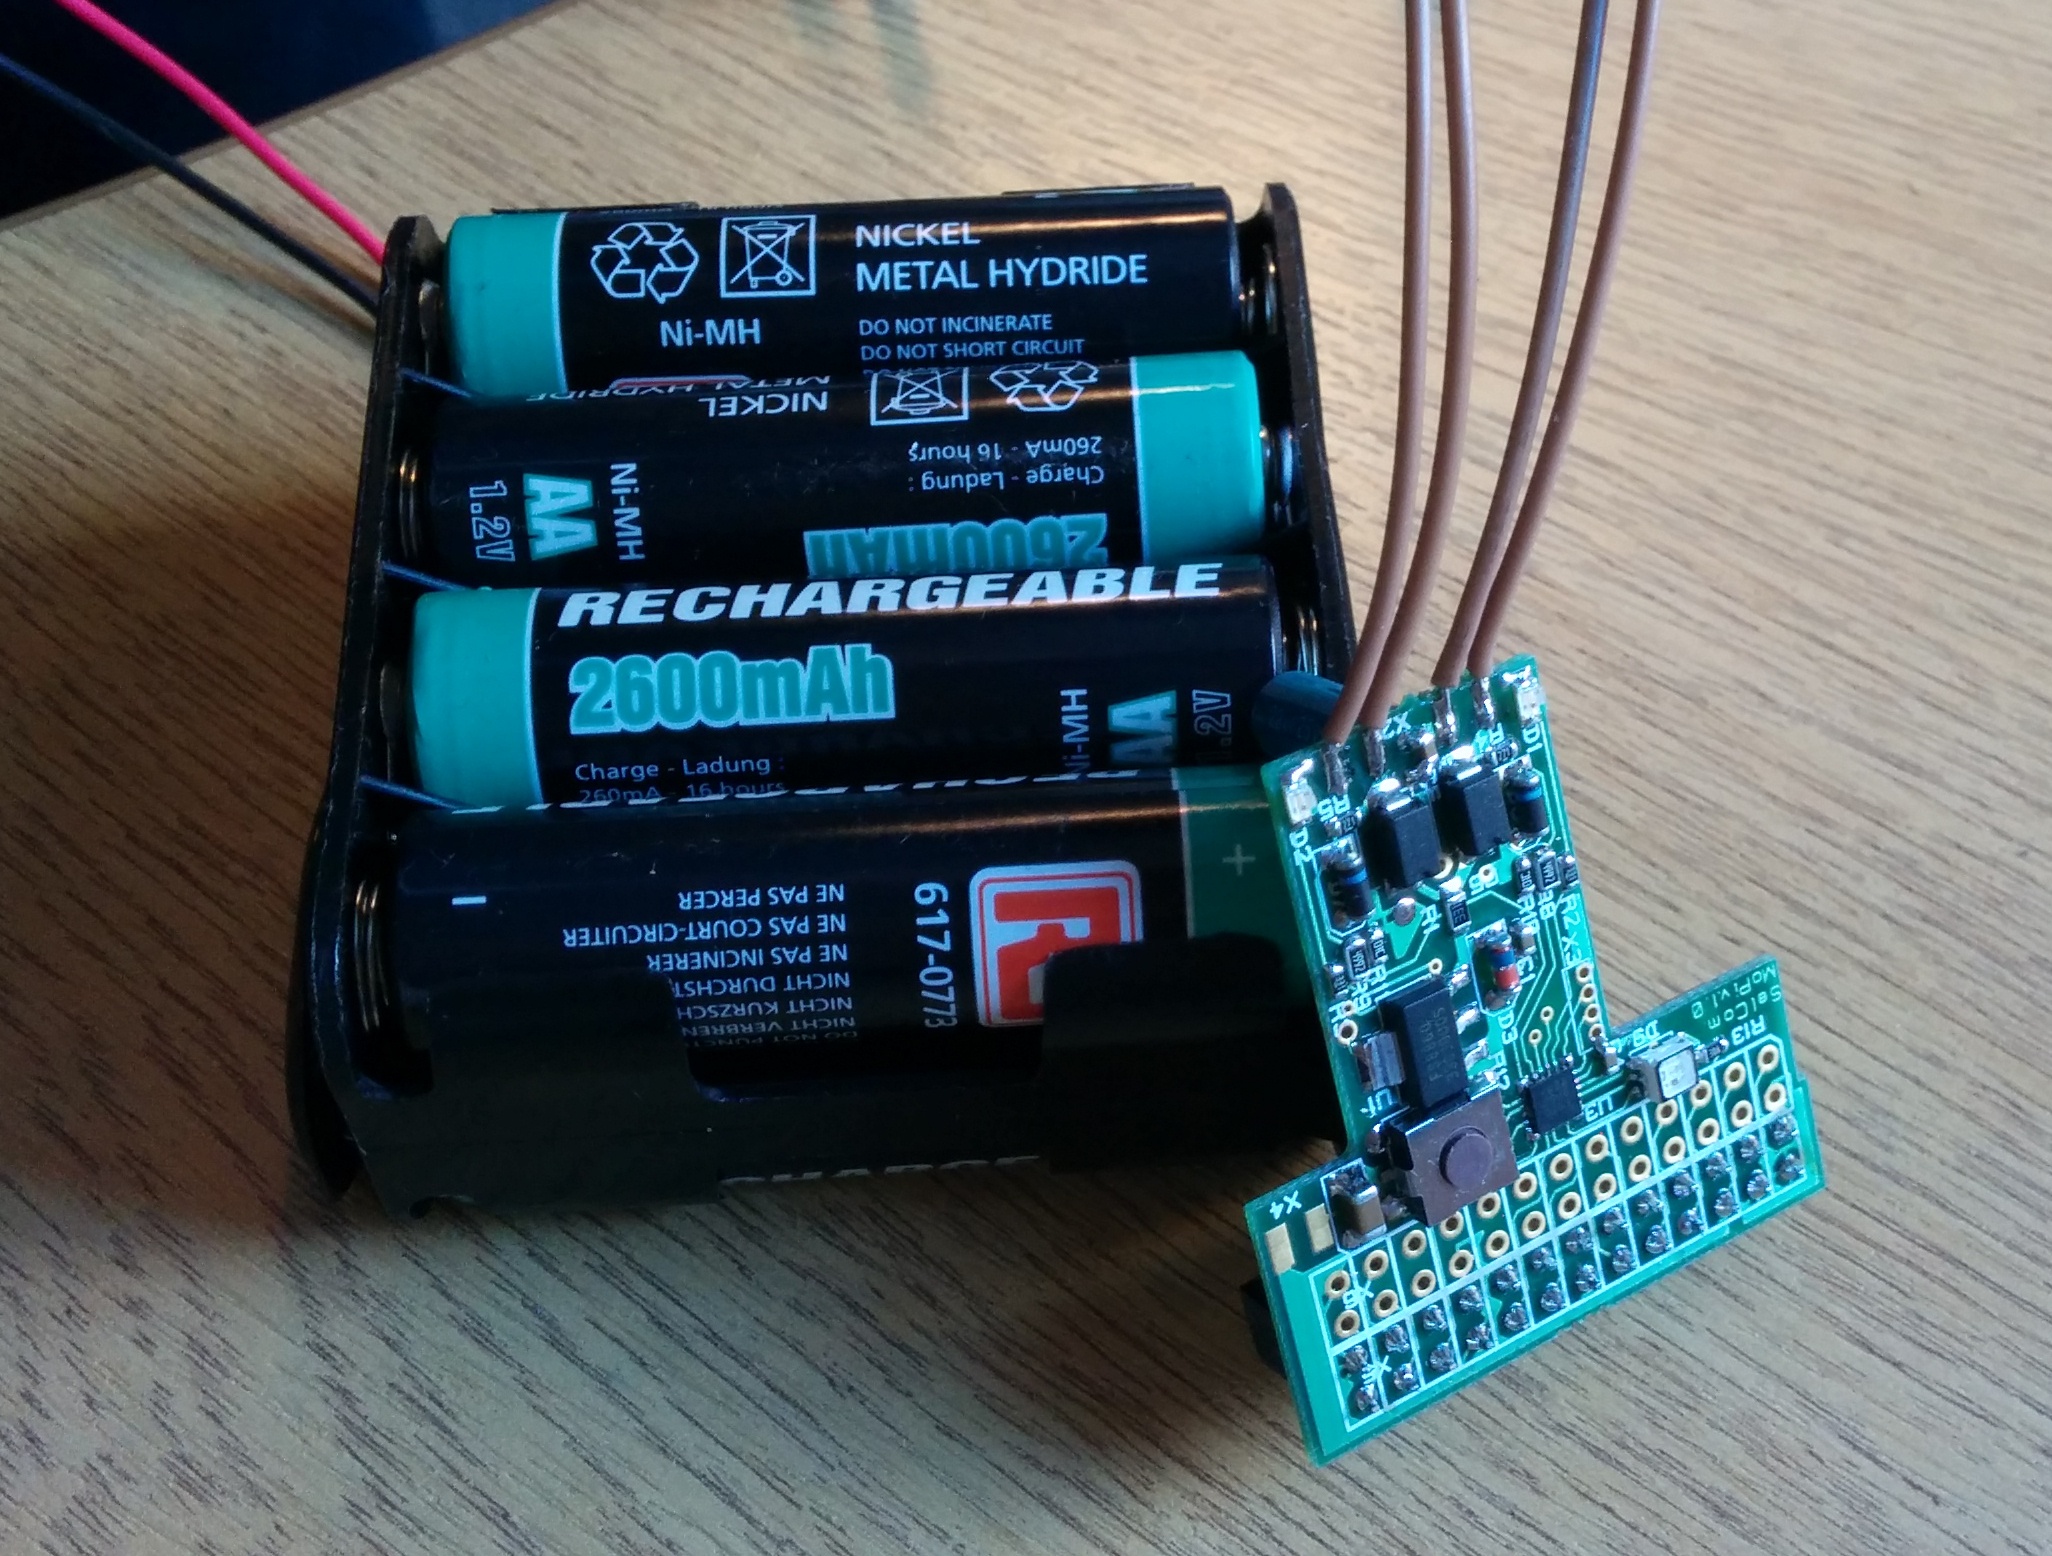
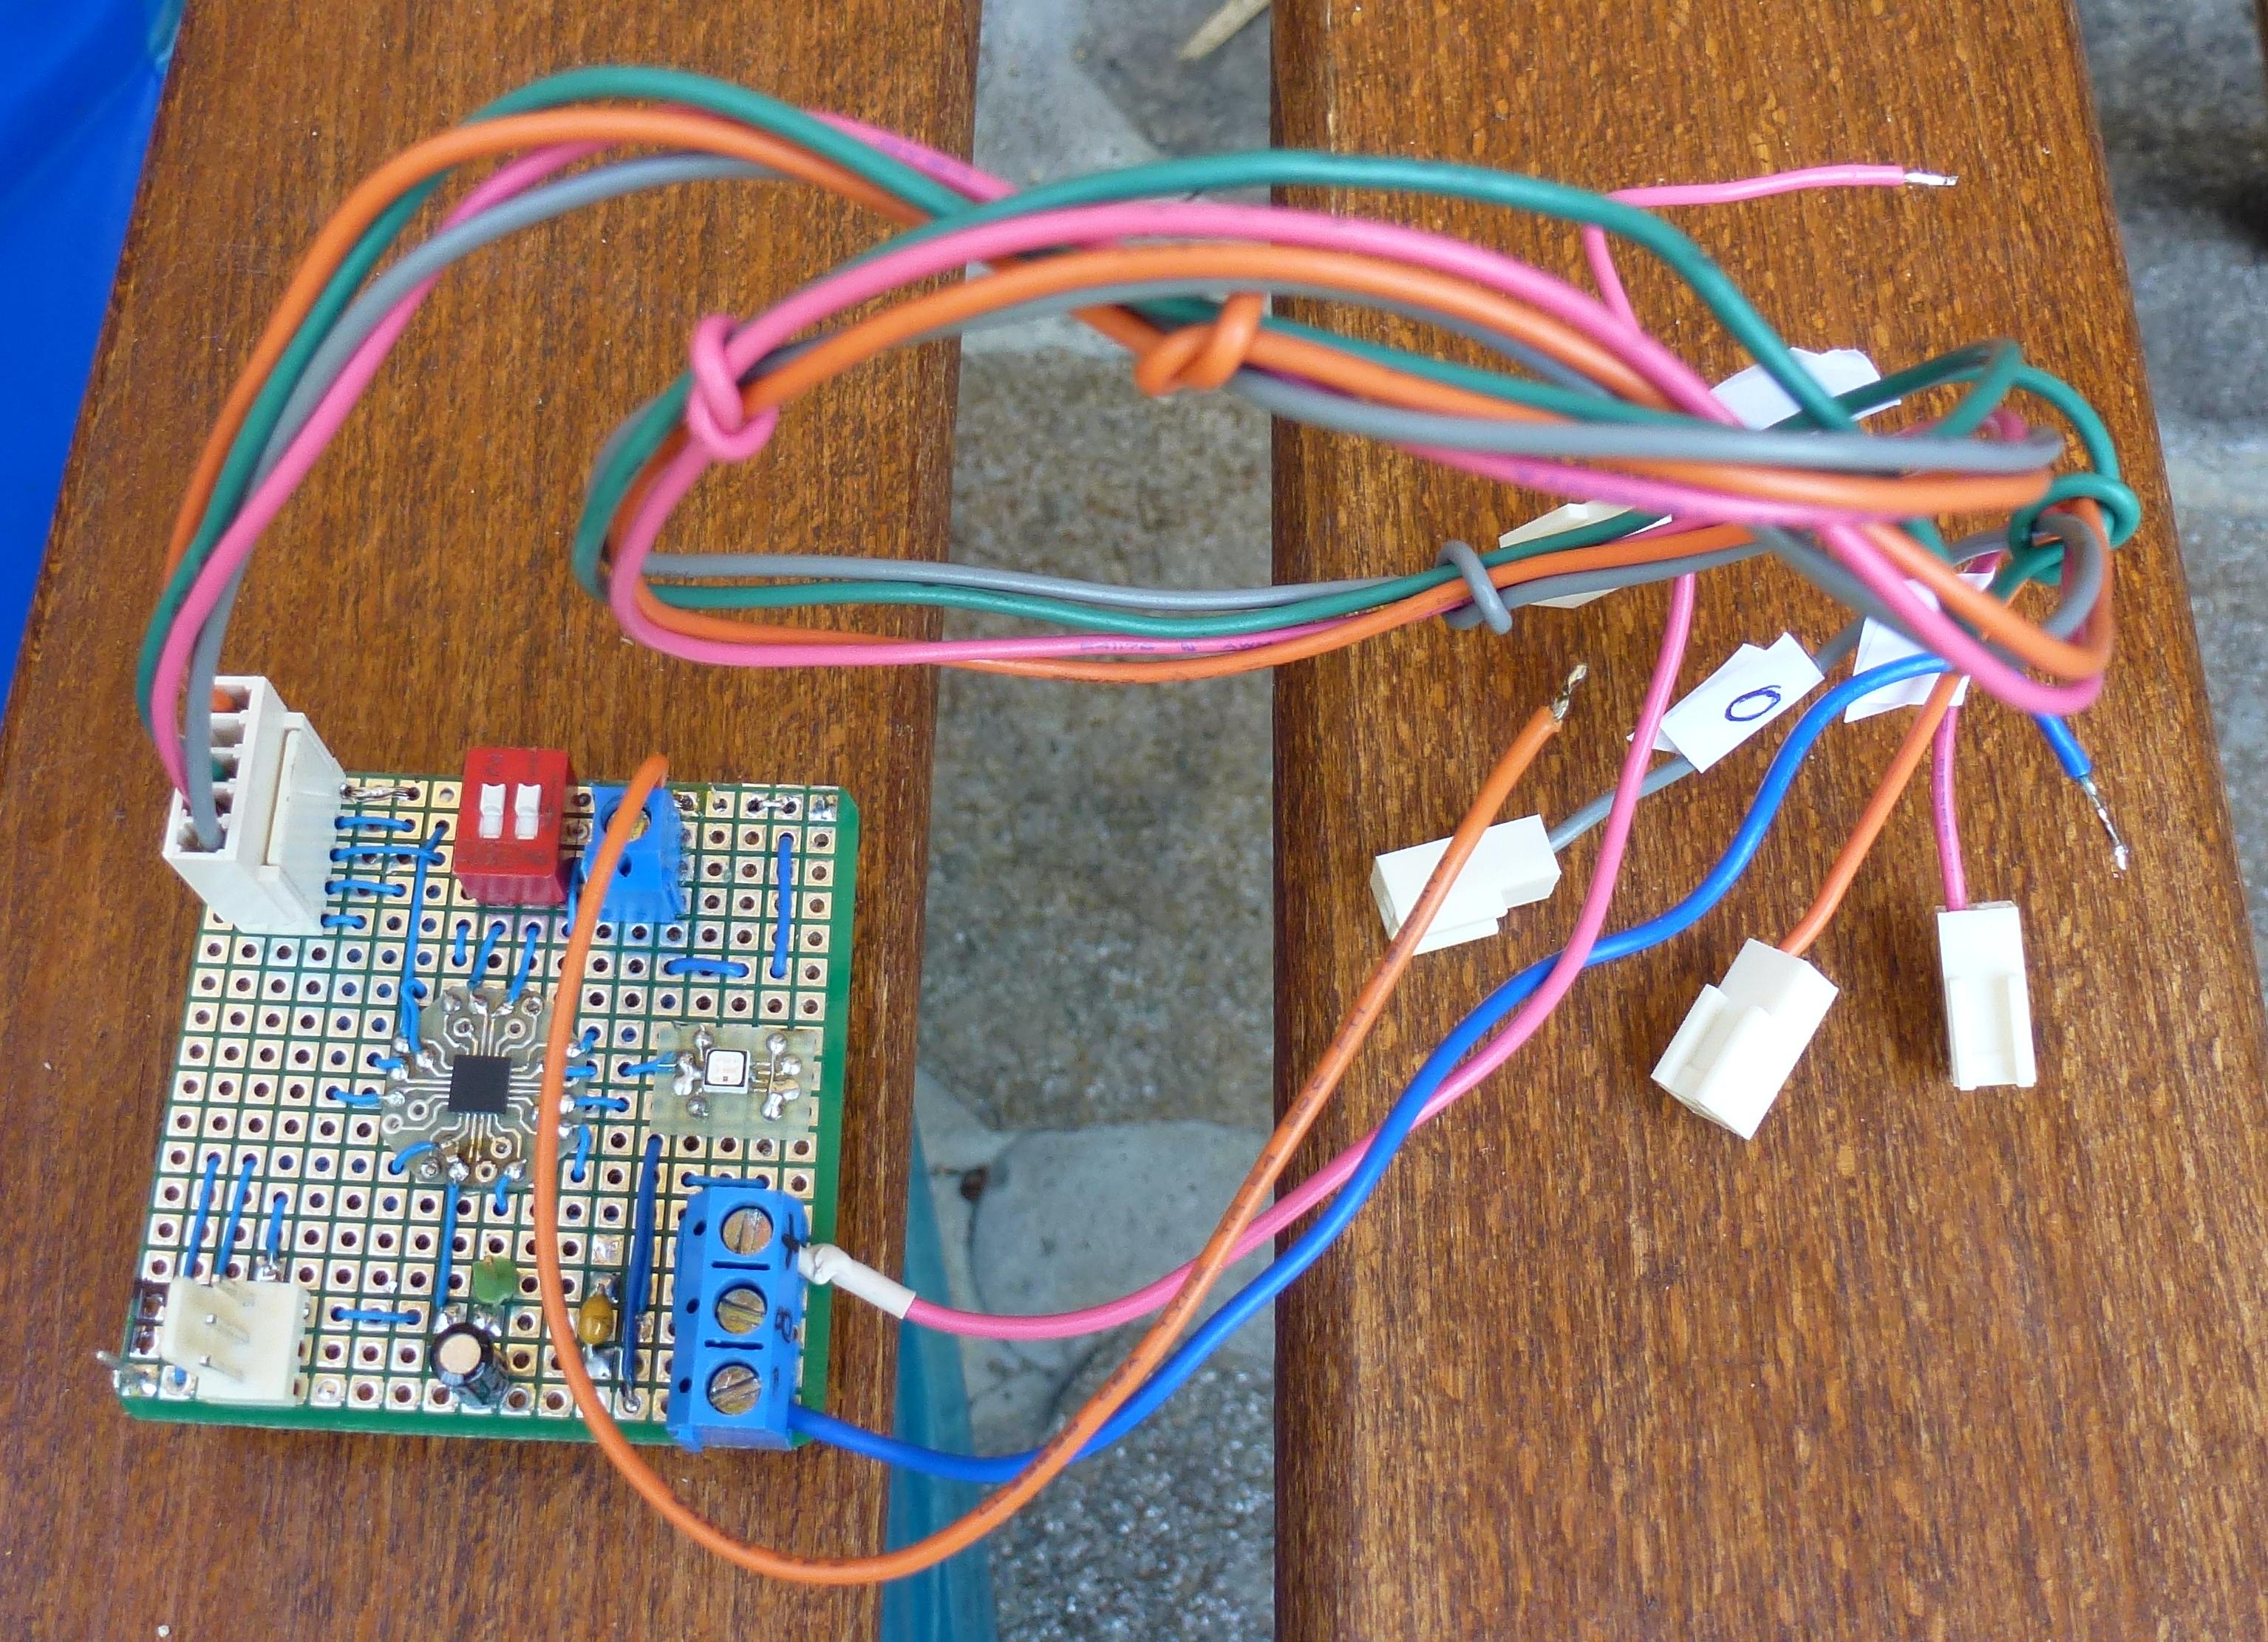
And here are the first-generation prototype boards (with separate regulator and controller):
|
|
|

The software is open source (of course) and available at our Pi-Tronics repository.
There is lots of detail of how it all works below, but first let's take a look at performance.
2.3. A Longer-Lasting Snack
So, how long will the batteries last?
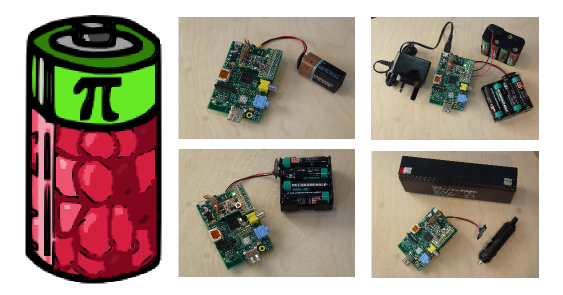
My first test was a Model B Pi with almost no load (USB keyboard and mouse; monitor attached over HDMI but switched off after starting the test; no network or other peripherals). Using eight rechargeable Duracell AA NiMH 2400 mAh batteries (like these ones) the Pi ran for 9 hours 31 minutes. Not bad! Especially when you consider that the MoPi regulator supports hot-swap of new charged packs — this looks very viable for mobile Pi applications of all shapes and sizes.
For comparison I set up the same rig with a USB battery pack from RS (this one, a 5200 mAh Lithium polymer model). The results were remarkably similar, with the RS pack lasting for 9 hours and 21 minutes.
Since then we've conducted 101 different tests. There are two key factors in Pi battery life: 1. Model A vs. Model B; 2. the peripherals. To summarise:
- You can expect a Model A to get near to double the life of a Model B.
- What you connect to the Pi makes a huge difference. For example: WiFi is a power hog: halve your expected battery life if you're using it. An accelerometer, in contrast, is cheap: e.g. XLoBorg won't reduce your running time by much at all.
You can also connect two battery packs to MoPi and get double the running time.
3. The Future: Development Schedule
![]() We've got two sets of developments we want to make: 1. finishing off the
perfect Pi power board (next section); 2. putting together some
imagination-capturing outdoor learning kits for schools (below).
We've got two sets of developments we want to make: 1. finishing off the
perfect Pi power board (next section); 2. putting together some
imagination-capturing outdoor learning kits for schools (below).
3.1. Power to the People
The basic functionality is all in place — just pledge us your £20 and we'll get you on the road ASAP. (With your own batteries — we'll also supply high-capacity rechargeable batteries for the more expensive pledges, or a UPS rig, or even a full kit including Pi and the works for £130. A bargain!)
Future developments:
- dealing with more rechargeable battery chemistries (we currently support Alkaline and NiMH; Lithium-ion is in progress)
- the internal Pi circuitry can run on 3.3 volts (saving some power loss in the on-board linear regulator — Dave Akerman's balloons use this strategy to increase battery life); we'd love to add a mode that supports 3.3V
- the communication is currently one-way: MoPi tells the Pi about the state of the batteries, signals for shutdown requests and so on — if we add 2-way communication (on the I2C bus or using one extra GPIO pin) then we'll be able to support configuration from the Pi itself
- to support the widest range of battery options we can't do charging; it would be nice to add an option for charging common configurations
With your help we'll add all of that to the mix!
3.2. Experimenter Kits for Schools and Outdoor Adventurers
The Pi was designed to give a boost to science and technology education, and it has already made a huge impact — here in the UK, for example, we have a shiney new computing curriculum in the works. There a whole load of reasons why we need to educate our kids about technology, and how technology can help them cope with the challenges that the future holds. And not just any technology — the Pi has a low carbon footprint, and it's the first mainstream device to be made in Europe for many a year.
We're involved with putting together Pi kits for schools — only for indoor use up to now, but this Kickstarter will allow us to create outdoor experimenter kits to help teach the links between technology, climate, wildlife and the like.
We're offering three kits (for young or old!):
- Outdoor Adventurer Kit
- Outdoor Experimenter Kit (Light)
- Outdoor Experimenter Kit (Light and Air)
Then we're offering a set of kits that make up a Schools Outdoor Lab rig, complete with a selection of fully worked lesson plans to get you started. Ideal for teaching basic physics, climate, environment, biology (and of course computing). If you cover our travel expenses we'll even run a introductory lab day for you on site.
3.2.1. Outdoor Adventure Kit
The base level kit has everything you need to get out and about: a Raspberry Pi Model B, case, SD card, and a MoPi board with NiMH batteries, holder and charger (and a wall supply for when you get home!).
Buy one for yourself and be on the road in minutes. This kit also makes a great gift for someone yet to experience The Joy of Pi :-)
3.2.2. Outdoor Experimenter Kit (Light)
This kit has all of the previous one, plus the Raspberry Pi camera module (day or night versions). Ideal for all types of outdoor motion-sensing and photography projects. If you haven't tried the excellent Pi camera yet here are a couple of examples:
Forest Gump came by the office when we were testing an early battery-powered camera rig (a hackable "GoPro"?!):

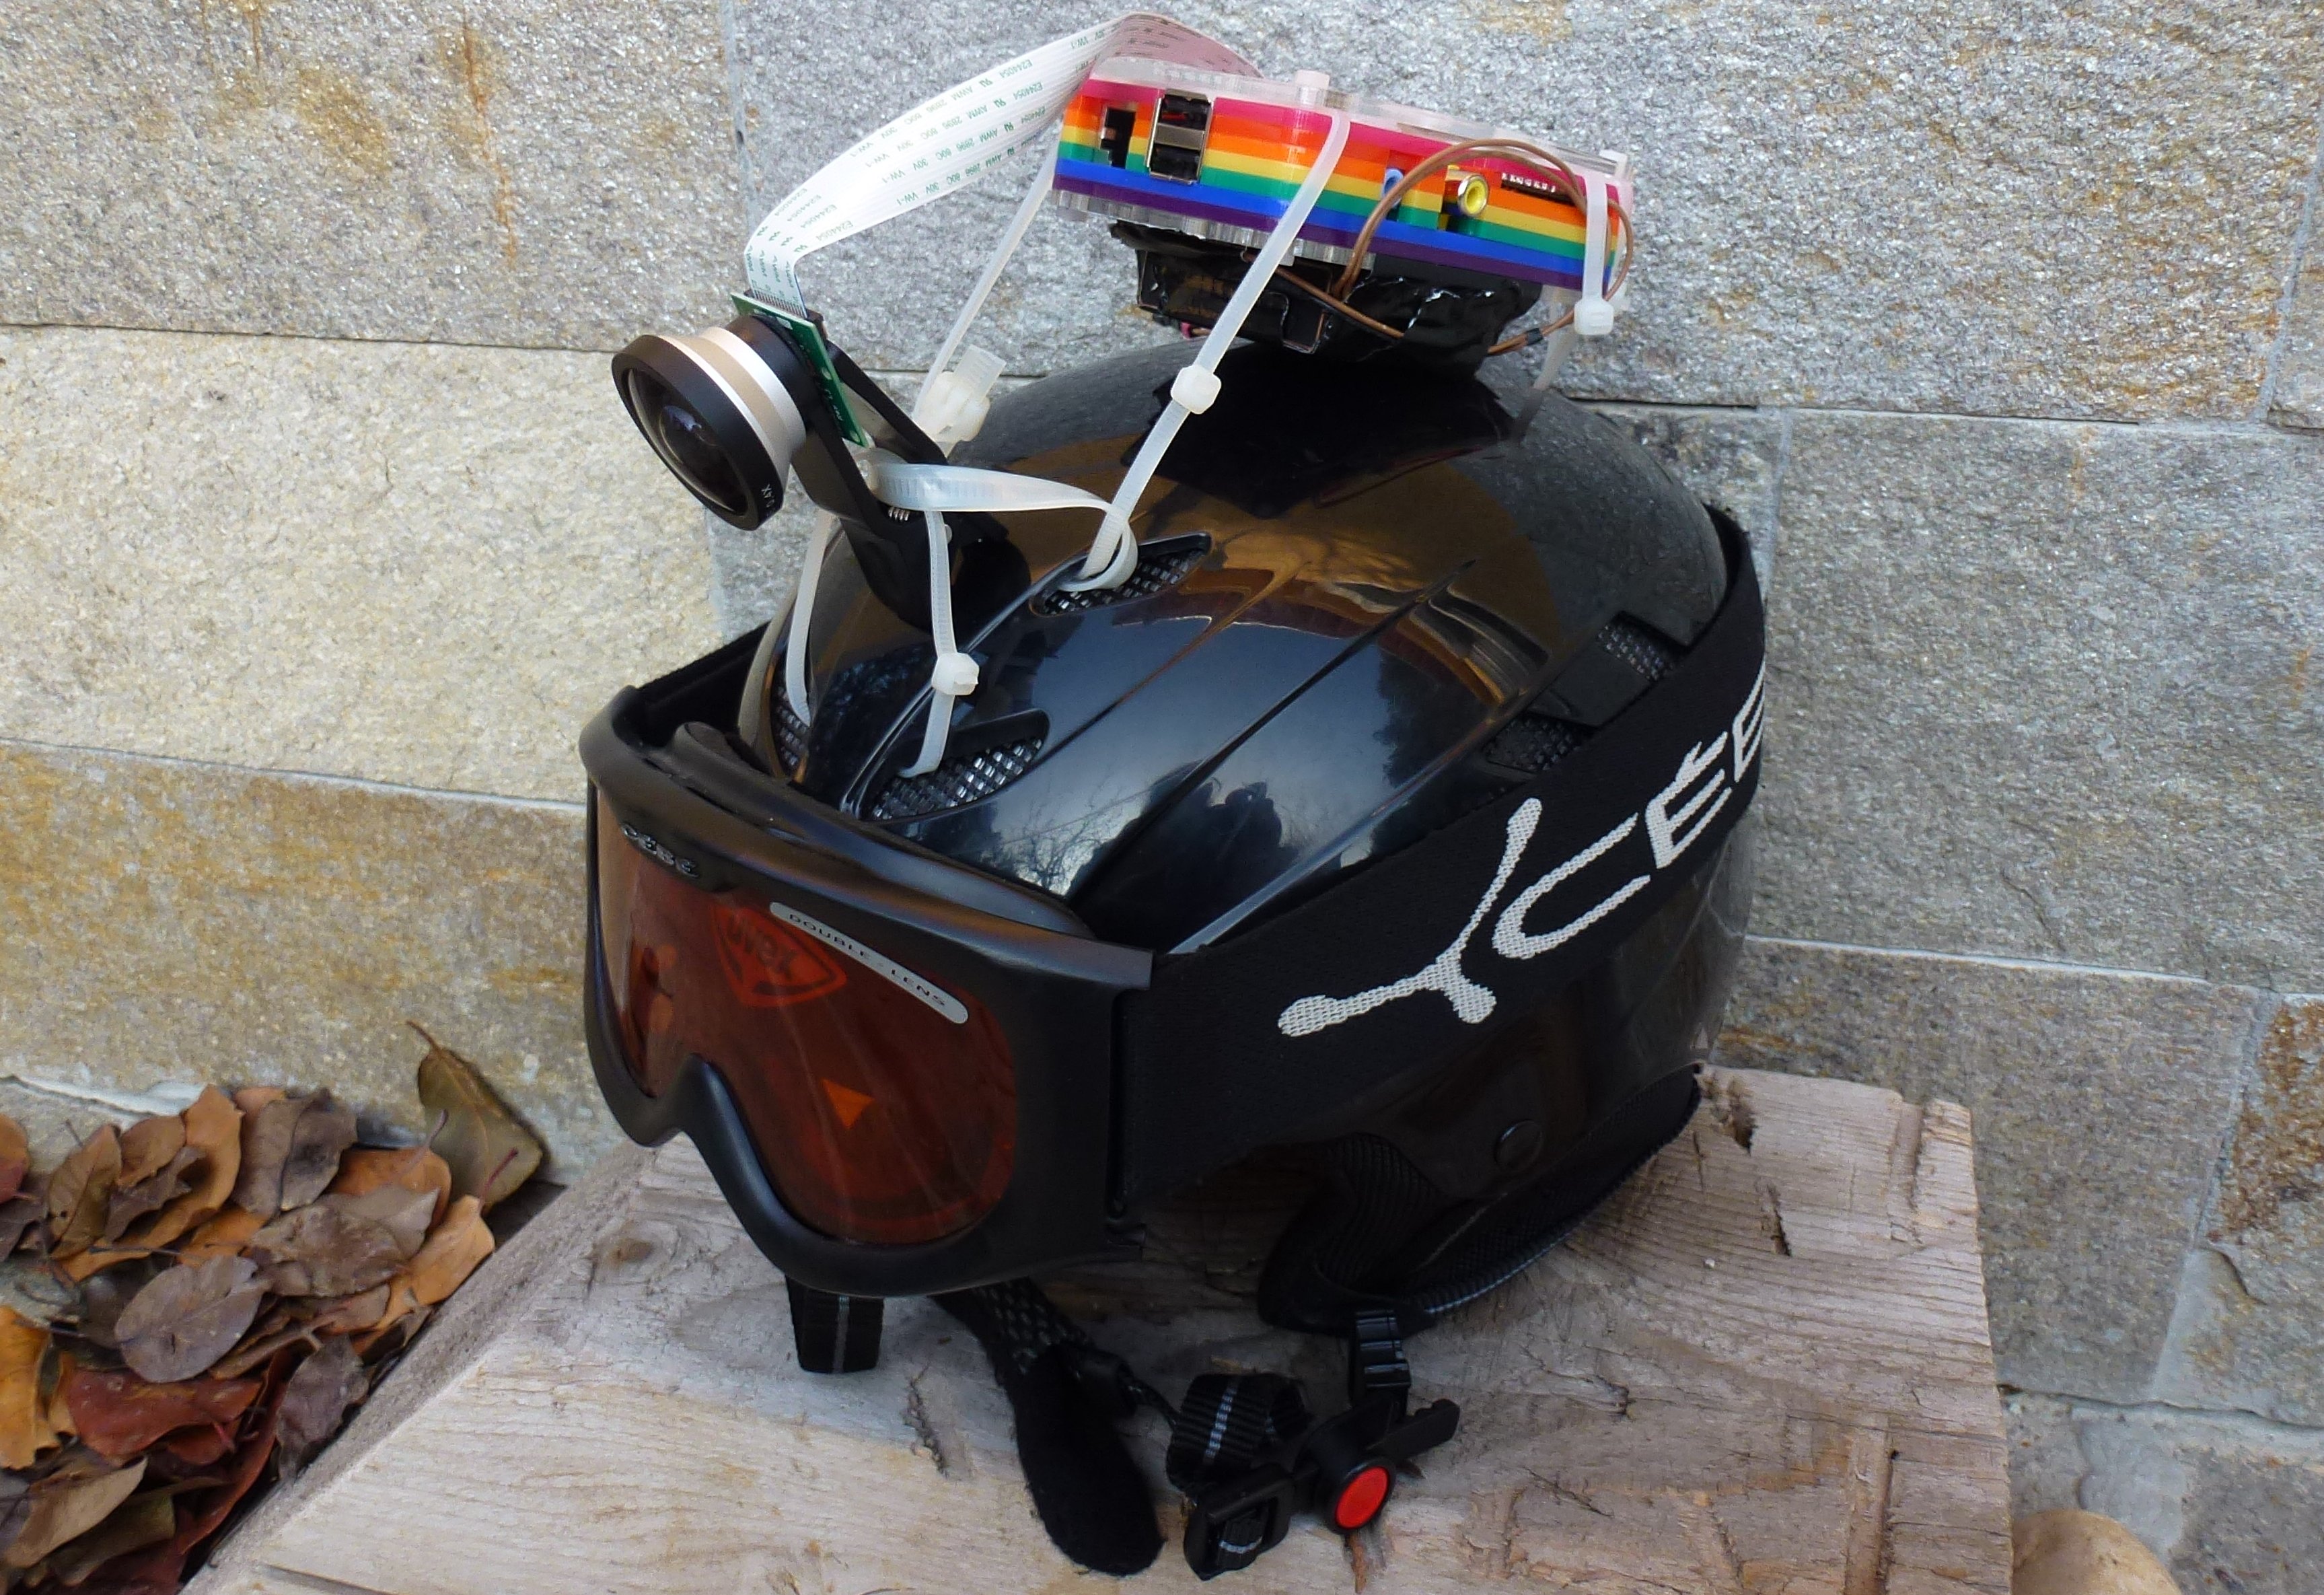
The next olympic downhill ski champion straps a Pi cam to his head:

Here's the camera rig:
People have done all sorts of stuff with these cameras — from videoing Teddy Bears in the stratosphere to night filming wildlife — the educational opportunities are obvious.
Where do you want to use yours?!
3.2.3. Outdoor Experimenter Kit (Light and Air)
If you watch the film Chasing Ice you can't fail to be amazed when a vast chunk of glacier the size of Manhattan suddenly disintegrates before your eyes. What are the climate changes that have triggered these massive events? How do they play out in the air we're breathing? How do you measure atmospheric conditions, and what science can we use to explain changes in those conditions?
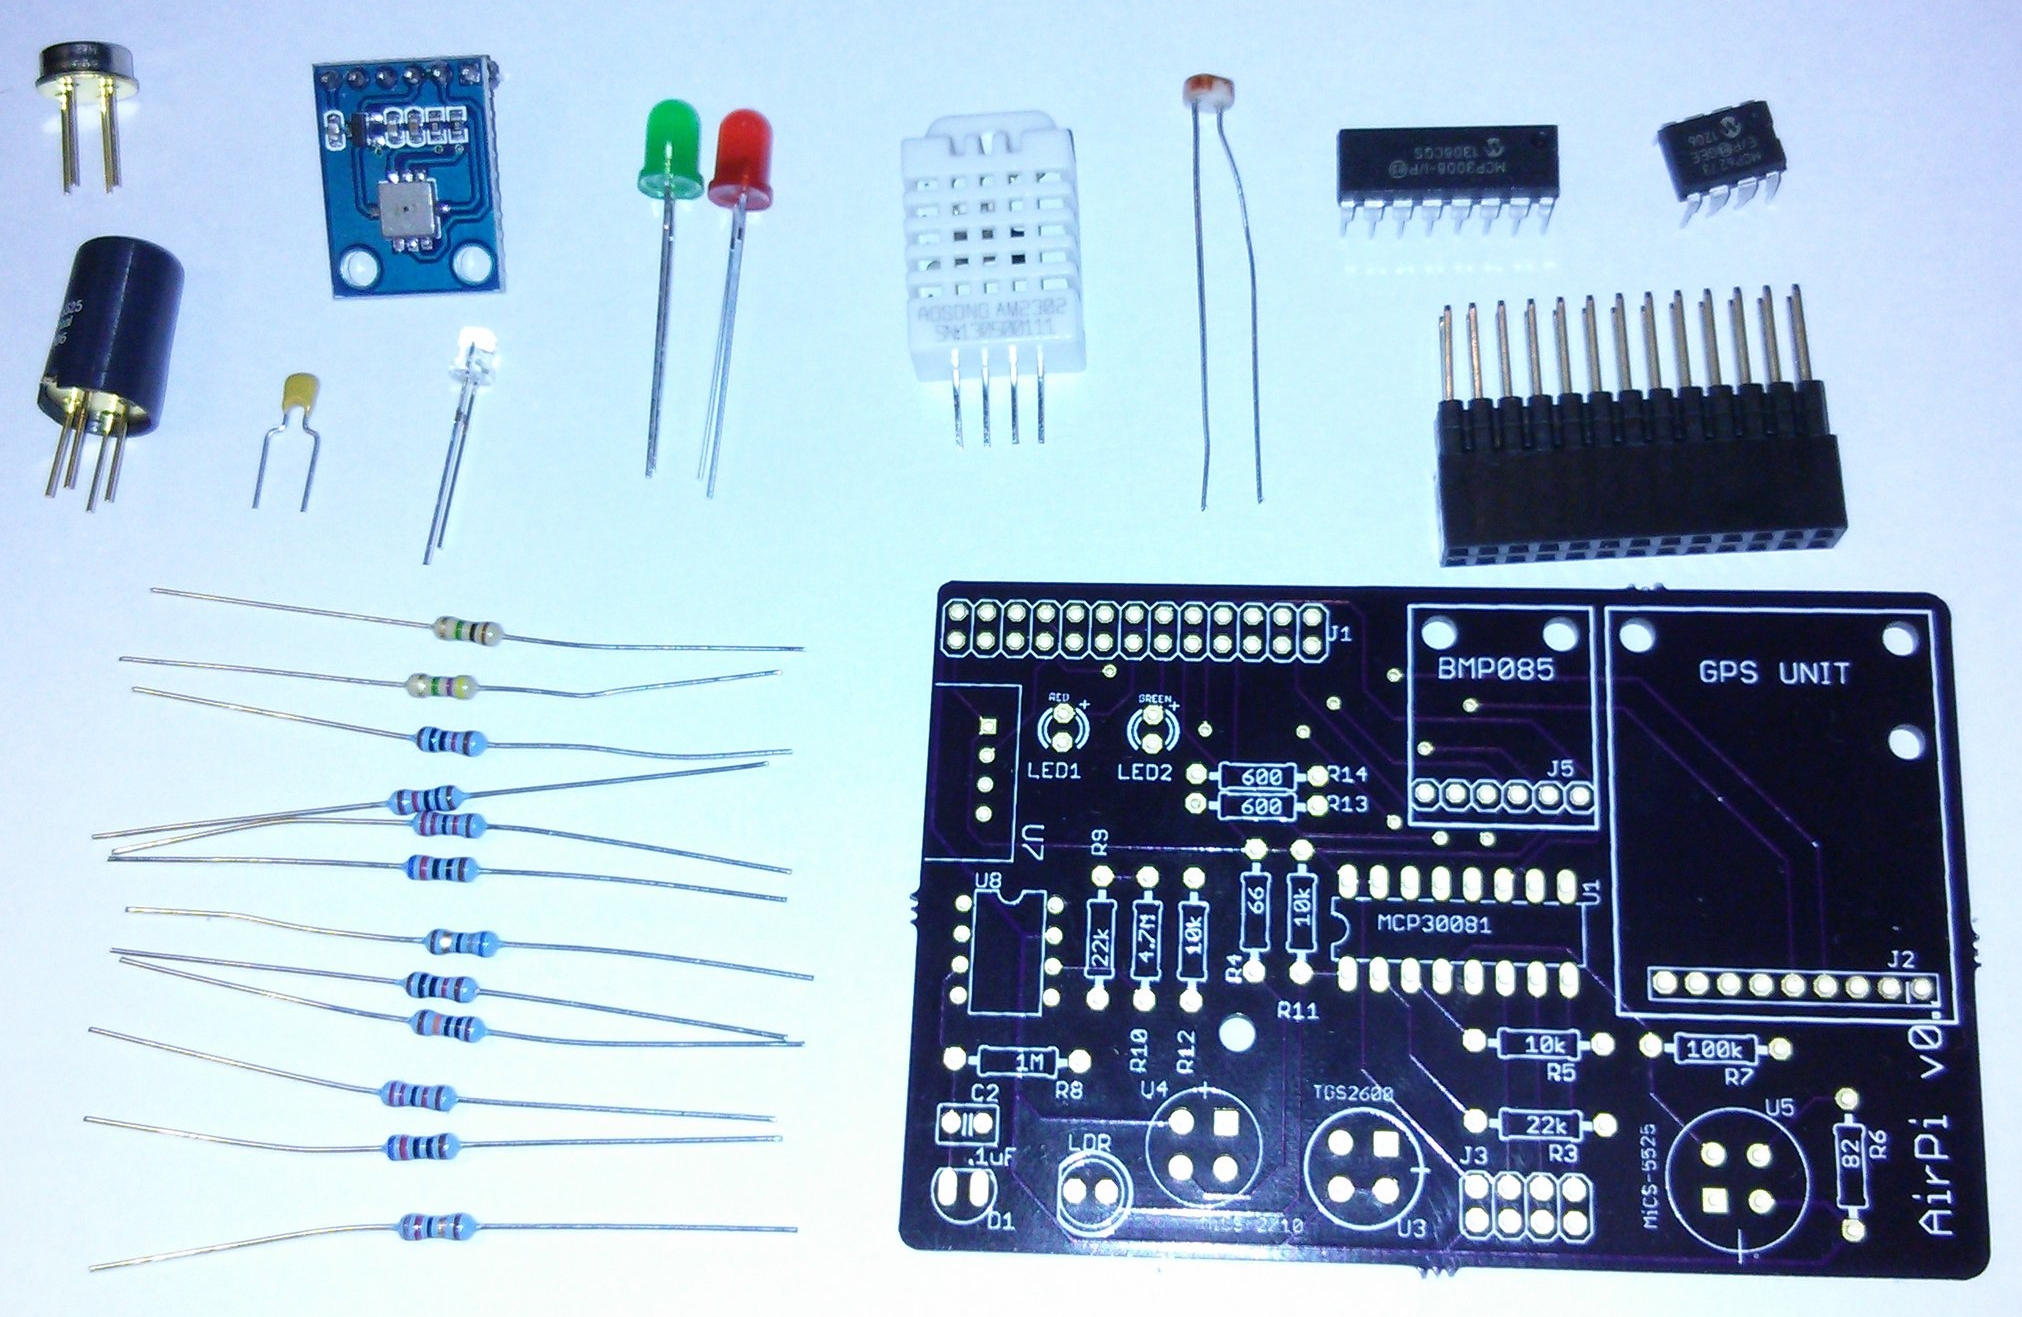
Meet AirPi, a brilliant Pi-based atmospheric monitoring kit that ran a crowdfunding campaign in 2013 and started shipping in the autumn. If you pick the Outdoor Experimenter Light and Air Kit pledge we'll include an AirPi with your mobile rig, all set to get out and about measuring temperature, relative humidity, air pressure, light levels, smoke, and the concentrations of the harmful gas pollutants carbon monoxide and nitrogen dioxide, and plotting the results direct to a webserver running on the Pi.
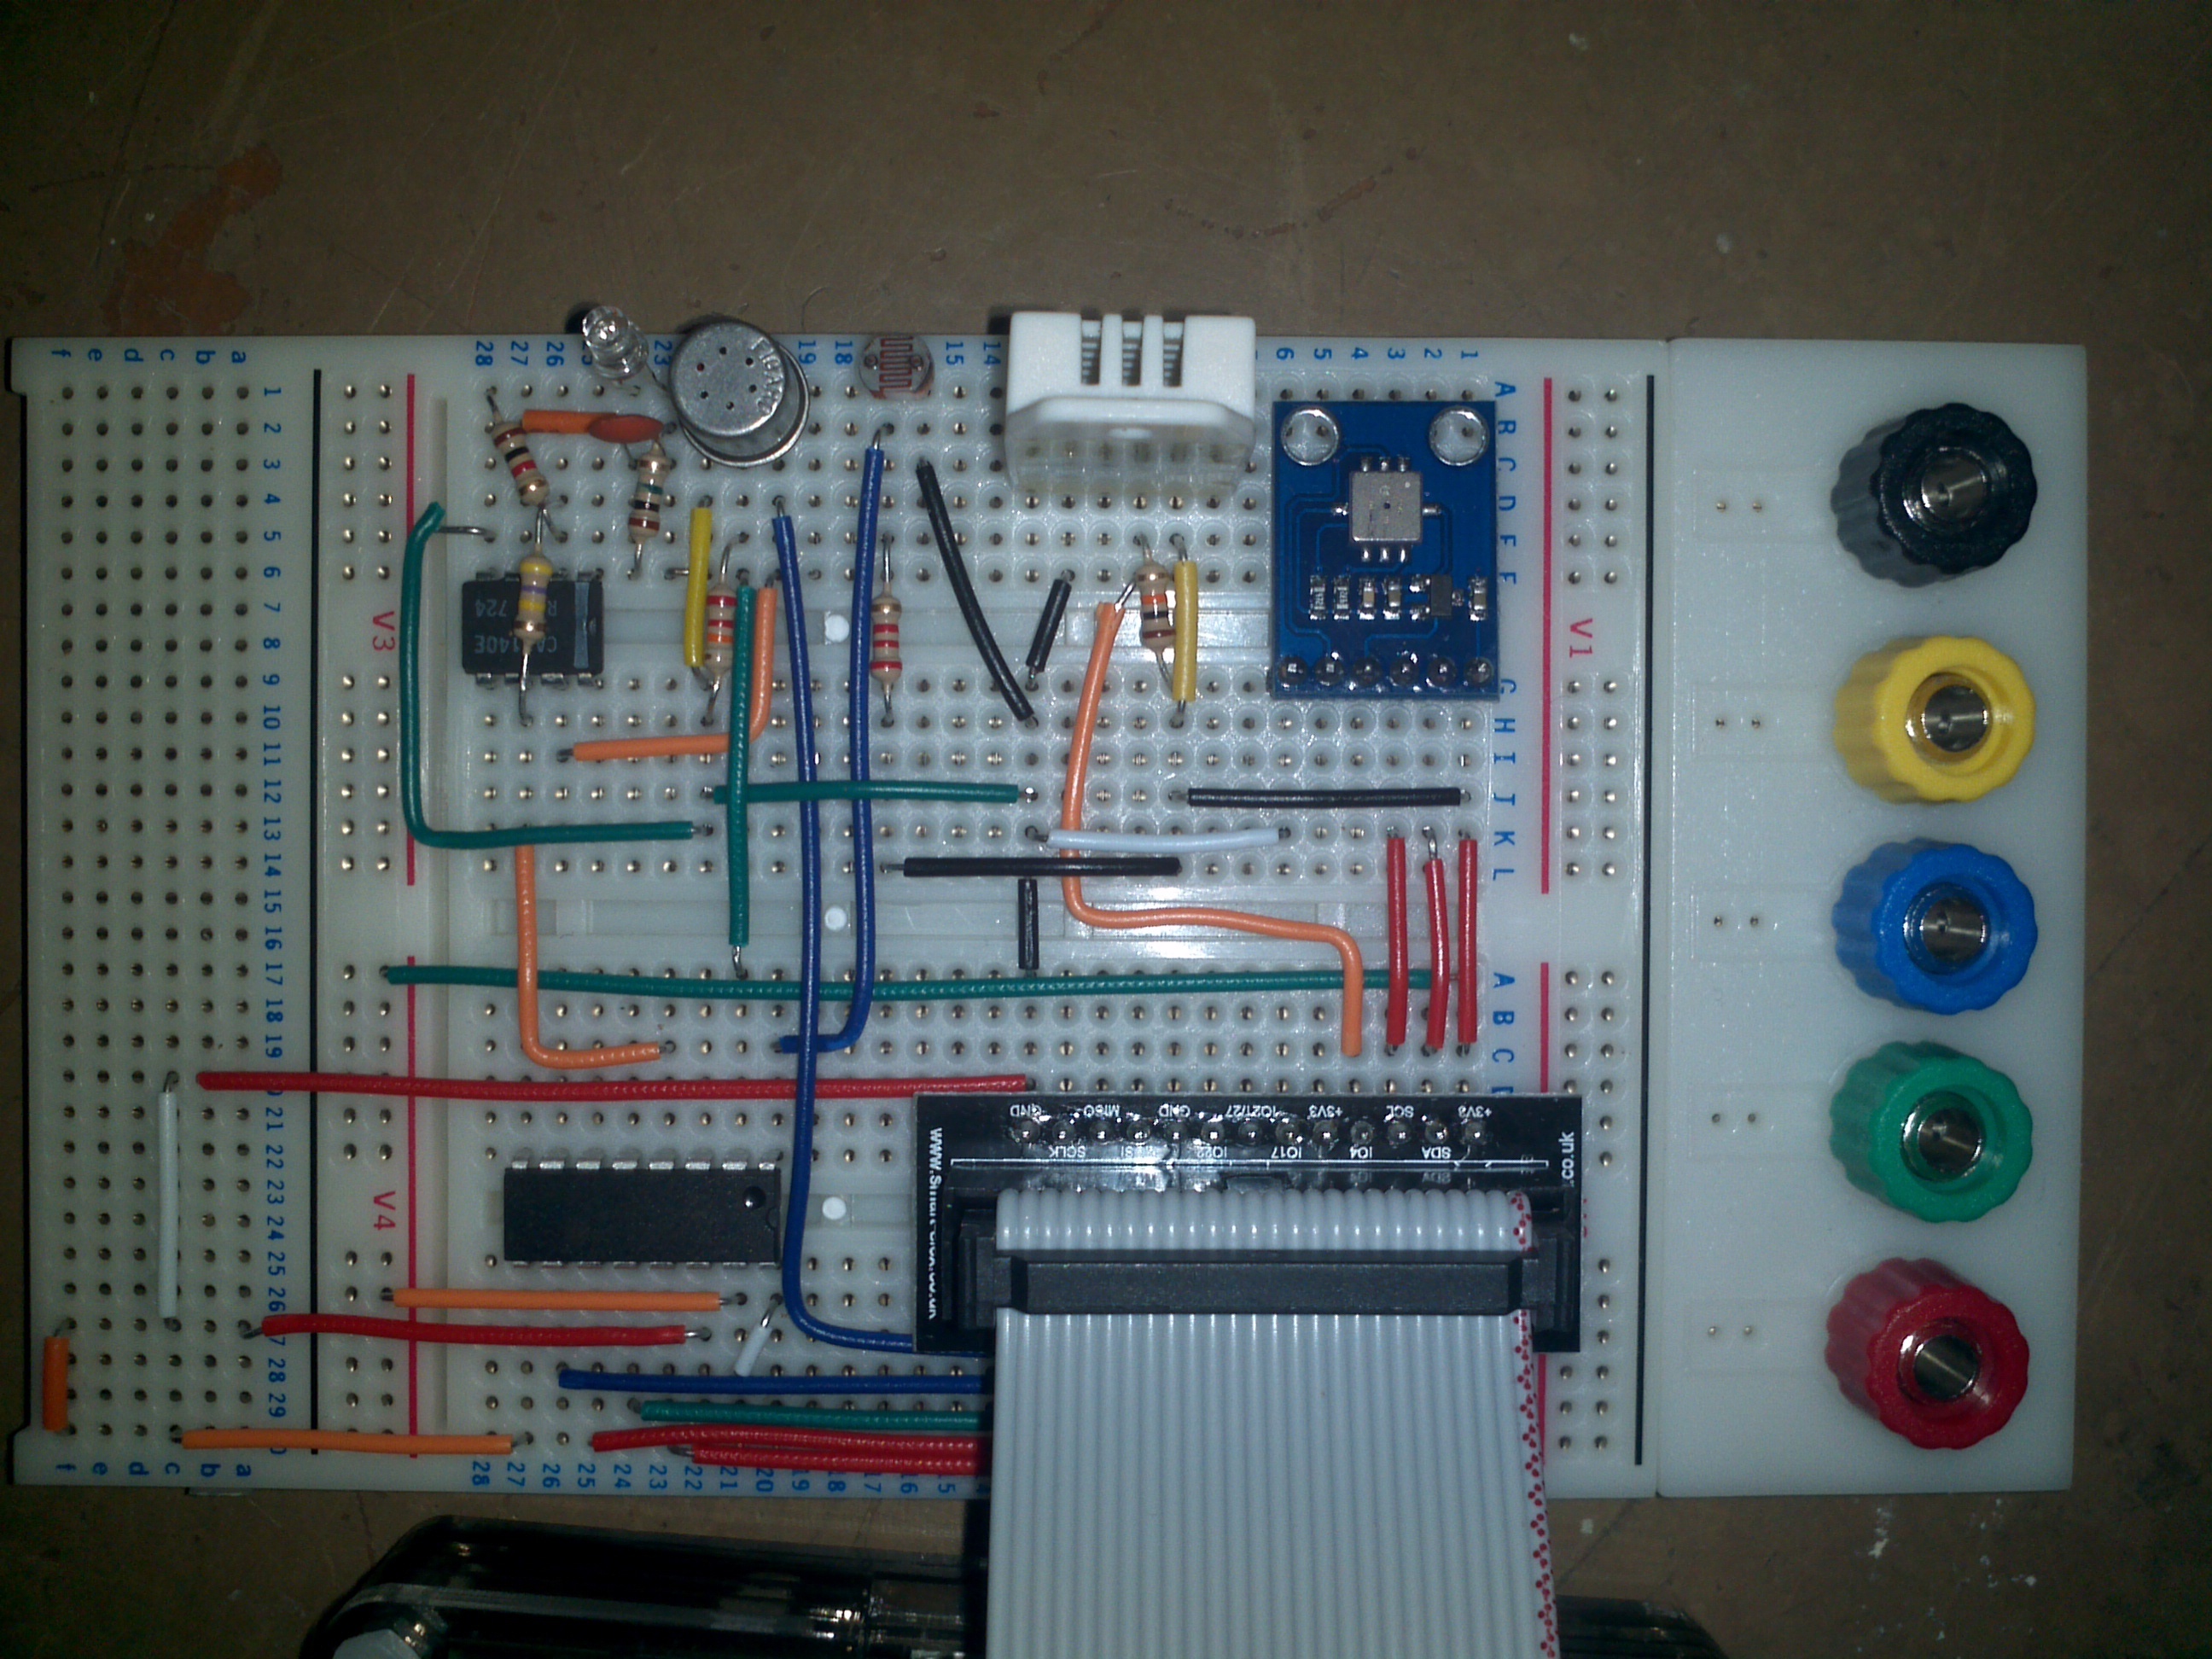
Here's the AirPi board, sensor and indicator set:
And here's one we built up on a breadboard:
The third MoPi prototype uses a different set of GPIO pins in order to avoid conflicts with AirPi (thanks Tom Hartley, creator of AirPi, for his help with this).
3.2.4. How Kickstarter Will Help
There are two chunks of work here: first is putting together a hardware set that can do stuff that kids (and their teachers!) get interested in; second, and at least as important, is developing the lesson plans, learning and evaluation materials that make it quick enough and easy enough to incorporate the Pi into existing educational schedules.
We've got our own educational specialist all lined up, and your support on Kickstarter will unlock the resources to make it work. And we'll make it all open source in return.
If you have the funds to pay for a whole outdoor lab (for multiples of 10 students) then we'll supply you with the whole kit and caboodle — and even come visit to deliver an on-site training day for teachers, parents and pupils. (With DBS/CRB registered and STEM ambassador instructors. Travel costs and volume limitations apply!) If you want to dip your toe and support our development of the educational materials then just pick up one of the kits listed above.
Thanks!
3.2.5. Production and Fulfillment Plan
We'll carry out the development plans detailed above in the following stages:
- Complete prototype board level 3. We have a few hardware changes left to
make (changing GPIO pins to fit in with AirPi; adding better connectors;
etc.). Then we'll revise the PCB layout and order another batch of
prototypes. Solder them up (with a big magnifying glass — the
surface-mount components are tiny!) and get testing. We'll make a bigger
batch for version 3 than previously, and push them out to heavy Pi users to
get use and abuse and a final round of feedback. Continue work on the daemon
and the firmware (mainly the 2-way communication code and Pi-based
configuration option). Start project updates and regular newsletter to
friends and the community.
- Completion: February 2014. (Project updates ongoing through September.)
- Finalise the design of the production board. Fix any residual issues arising
from testing. Incorporate any feedback from Kickstarter backers (you!).
Start ordering components, kit parts and PCBs in bulk. Finalise the
pick-and-place manufacturing process and start pre-production testing.
Continue work on the firmware and produce the production binary for flashing
to the production boards. Address any stability issues in the daemon code.
- Completion: March 2014.
- Start taking delivery of the production boards. Fulfill the early bird
orders. (This is our last opportunity to make firmware changes. Test, test
and test again!) Resume work on the educational materials: catch up on
developments in the curricula, the Cambridge GCSE MOOC, etc.; more project
work with the camera and with the air sensors board. Set up pre-order
mechanism for retail version. The daemon should be very stable by now.
- Completion: April 2014. (Educational work continues through the summer.)
- Fulfill remaining (non-early bird) orders for all single item and kit
rewards. Select lesson plans for delivery with the schools rigs next month.
Solicit additional GitHub committers for the daemon code to help with
long-term maintainability.
- Completion: May 2014.
- Finalise the first version of the educational materials. Prepare schools rig
orders. Revisit long-term production and retail supply options. Work on the
workshop days and deliver some trial runs locally. Agree delivery schedule
for workshop days.
- Completion: June 2014.
- Finalise the workshop days and deliver. Set up sustainable production
process and retail board supply. Set up sustainability mechanisms for the
educational materials.
- Completion: September 2014. (Workshop delivery ongoing. Retail board supply ongoing.)
- Collapse in a small pile.
4. How MoPi Works
There are three dimensions to the problem of mobile power for the Pi:
- regulation, to supply the constant 5 volts at up to around 1 amp that the Pi requires
- control: keeping a check on battery charge, switching the regulator off when charge is getting low, and reporting the current level to a monitor
- monitoring: reading level indications from a GPIO connection, reporting it to the Pi user and shutting the operating system down cleanly when levels get critically low
The first two of these need some special hardware (see "The Hardware" below); the third is written as a software daemon. (We'll sketch these here — Pi.GATE.ac.uk has more of the gorey details.)
4.1. Monitoring
All Linux systems share the concept of a daemon, which is a system-level service which gets run during operating system startup. It is quite easy to implement a battery monitor daemon that listens on the Pi's GPIO pins for level changes signalled by the MoPi microcontroller board. The daemon then makes entries in the standard system logs as a simple way to share data with other subsystems, and can be configured to send a warning message to all users if levels are low. Best of all, the daemon can easily shut down the Pi cleanly before the regulator voltage gets too low for reliable operation.
The rest of this section describes the implementation of the daemon. It is designed for the MoPi boards, but should be quite easily reusable for other battery power projects.
4.1.1. SimBaMon: a Simple Battery Monitor daemon
SimBaMon is an open source Linux daemon for
- monitoring battery levels (via the gpio command)
- sending warning messages to the user if the battery is low
- shutting down cleanly at critical battery levels
- managing a power supply on/off switch
- writing relevant data to the system logs
You can find the source code on GitHub. The core of the daemon is defined in three files:
- /etc/simbamon.conf — configuration data
- /usr/sbin/simbamon — the daemon itself
- /etc/init.d/simbamond — an interface to the init subsystem that Linux uses to manage daemons (amongst other things)
The last of these, simbamond, is used by the operating system to start and stop SimBaMon at boot or shutdown time, and can be used to control the daemon manually when required. For example this command will stop the daemon:
sudo service simbamond stop
The configuration file, simbamon.conf, defines a set of states in which the monitor will take some action (power off, battery empty, battery level critical, battery level low, battery level good).
The MoPi microcontroller supplies these states via three Raspberry Pi GPIO pins (and also sets on-board indicator LEDs accordingly). The core of SimBaMon, a shell script that lives in /usr/sbin/simbamon, implements an infinite loop that checks the levels being reported over GPIO every few seconds and takes any necessary action. The three GPIO pins connected to MoPi are used as a 3-bit binary value, which we convert to decimal using the bc command. The wall (write all) command is used to send messages to any logged in user.
Here's the main loop:
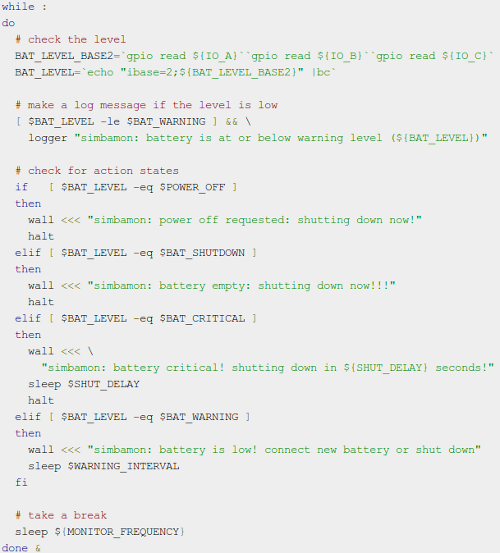
Here is the current version of the code. There is a full test rig, including debug mode (no shutdowns, shorter intervals) and simulation mode (GPIO input is simulated).
4.1.1.1. Installing SimBaMon
The Raspbian maintainers have been kind enough to include SimBaMon in their repository, so you can just do this:
sudo apt-get install simbamondThe software is also available from an Ubuntu Personal Package Archive (PPA). (The Ubuntu infrastructure doesn't currently work for binary Pi packages, but SimBaMon is implemented in script, so we're ok in this case.)
SimBaMon depends on Gordon Henderson's Wiring Pi, and we've made a Raspbian package for that library which should be in the Foundation repository soon.
4.2. The Hardware
The MoPi circuitry consists of two parts: a single-chip microcontroller and a five volt switching mode regulator. The microcontroller (with embedded firmware) implements all the functions related to voltage level monitoring, level signalling (via the LEDs and the GPIO interface), and on/off switching of the +5V supply to the Pi. Battery voltage levels are measured using the built-in microcontroller ADC (Analogue to Digital Converter).
The schematic looks like this:
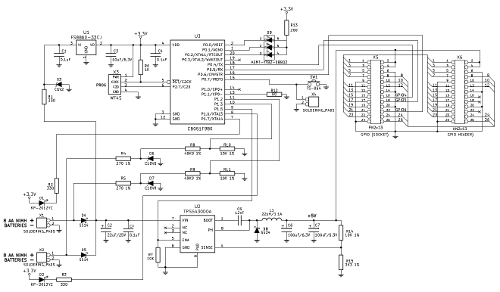
Two yellow LEDs are positioned next to the twin power pack inputs, and indicate their status (blinking when either voltage is critically low). The overall voltage level of both power inputs is indicated by one RGB (three colour) LED and is also sent to the Raspberry Pi over three GPIO lines. The 5 volts to the Pi is generated by a highly efficient switch mode voltage stabiliser, driven by the microcontroller. An open source daemon running on the Pi listens to the GPIO signal, informs the user of low battery levels and shuts the Pi down cleanly when levels are critically low (or when the power switch is pressed).
To start the 5V generator the power button should be pressed and held for 3 seconds. The microcontroller checks the voltage level of the attached battery packs and if it is above the defined operating threshold, it switches the stabiliser on to generate 5V for the Pi. The LED for the battery (or other) power input lights up, and the RGB LED lights up blue when the battery pack is fully charged (or green if the voltage level is within the acceptable operating range). A three-bit coded voltage level is also sent to the Pi over GPIO (using WiringPi pins 4, 5 and 6 — physical pins 16/18/22 — though this changes in version 3 to accomodate AirPi). During operation, the microcontroller continuously monitors the voltage level, and when it falls beneath a safe level it switches the RGB LED to red. Simultaneously the yellow LED for the low battery starts flashing, indicating that the pack needs replacement.
Then the daemon SimBaMon on the Pi gets a low battery signal and informs the user that they should either plug in another supply or shut down (again by pressing the power button for 3 seconds). If nothing changes and the battery continues to discharge down to a critical level, then the RGB LED starts flashing red and MoPi forces a shutdown. If the user wishes to continue to work and connects a new, charged battery pack (or other supply) to the second connector within 30 seconds then the new battery will prevent the shutdown, and the RGB LED will switch back to blue or green. The new input's corresponding yellow LED will light up. The user can then remove the old battery pack for charging.
Behaviour has to be adjusted for multiple battery chemistries; this is done within the microcontroller firmware. (In version 3 we also support chemistry configuration on the Pi itself, giving a wider range of options.)
5. Stretch Goals
Thanks to our backers so far we're going beyond our baseline. We've figured out a bunch of extras we can offer in MoPi if we get further (and the level of funding we'll need to make them viable):
- 150% (unlocked!): screw terminals, stackable headers, remoting pads and self-resetting fuse added
- 175% (nearly there!): two-way communication and remote power-off added
- 200%: 3.3V supply mod added
- 250%: timer-based wake-up added
- 300%: The PiBrush reward released
- 375%: battery charging added
- 430%: The HackCam reward released
- 590%: input voltage boost added
- 999%: The Pablet reward released
When we reach 150% funded (nearly there!) we can make these improvements:
- Screw terminals. This will make it easier to connect all different types of power supply (from batteries to water turbines) direct to MoPi.
- Stackable headers. We'll put a stacking header directly onto the board (and adopt the same case lid style as for the Pibow Model A). This will make it easier to connect multiple boards at once (e.g. MoPi + XLoBorg, or MoPi + AirPi, or etc.).
- Remoting pads. We'll add remoting pads for the power switch to help with applications where MoPi sits away from the edge of the case. This will allow the connection of an additional power switch.
- Self-resetting fuse. MoPi supplies power directly through the GPIO pins, which bypasses the Pi's built-in fuse. We think this is safe — but to be doubly sure we'll add a fuse in MoPi.
When we get to 175% funded we will add:
- Two-way communication. We're moving to I2C for communication between the Pi and MoPi, which will mean complete configurability from the Pi. (It will also minimise our use of GPIO pins and maximise the number of other Pi add-on boards that we can run with.)
- Remote power off. You'll be able to tell MoPi to power down the Pi when logged-in remotely (after a clean shutdown, of course).
If we get to 200% funded we will add the ability to mod MoPi for 3.3V operation (overpowering the Pi's on-board regulator and saving the power that is dissipated there, for weight and battery life critical applications like ballooning).
If we make it to 250% funded we'll add timer-based wakeup — tell MoPi what time you want your Pi to wakeup, then power it down and MoPi will boot the Pi as requested.
If we get to 300% funded we will offer our virtual paintbrush rig — The PiBrush — as a reward. PiBrush combines a MoPi with an accelerometer and is a great way to engage kids with Python programming and the physics of motion. When you've got one you've also got a programmable Pi-based Wii-remote-alike, and there are a ton of cool applications waiting.
Now, the one you've all been waiting for: charging! That's by a long head our most requested feature — but it is also pretty difficult :-( In fact, dealing with lots of different chemistries may not be possible on a tiny device like MoPi (most manufacturers of charging ICs only support one chemistry per chip, for example, and some only support charging a single cell per chip!). The other challenge is that we've got a really small surface area to work with on the PCB. So we need to get quite a bit further to have the necessary resources... but if we reach 375% funding, then we'll do it! We're not promising to charge every battery under the sun, but we'll provide charging for at least one popular configuration.
If we make it to 430% funded we'll offer The HackCam, a Model A Pi, a camera module, wifi and a MoPi, wrapped up in a water-resistant box with a 3 inch screen and the switching to make it work in the way you'd expect. The pictures are served directly to the web by an Apache running on the Pi, and with everything open source (of course) you can tweak the photographic parameters to your heart's content. A camera you can log in to!
Some applications would benefit from the addition of a voltage boost, e.g. when you've got a small surface area of photo-voltaic (solar) panel and want to trickle charge a backup battery. If we reach 590% funding we'll add a buck booster to cater for these applications.
Finally (for now!) if we get to 999% funding we'll offer The Pablet, combining MoPi with this touchscreen and case rig. We'll mod the case to add a couple of PP3 clips, and an external power switch. Hey presto! a Pi-based "tablet"!
(And if we reach 4000% Lubo says we can attach a rocket to it, though I'm a little suspicious that he's not totally sincere on that one.)