Blink IP
What's my IP? Tools to find the Pi's IP address without logging in
Hamish Cunningham, August 2013
Contents
- 1. Introduction: Catch-22
- 1.1. Getting the IP Address via ifconfig
- 1.2. Connecting to WiFi
- 2. Blink the Status LED
- 2.1. Installing and Running
- 3. Write a File to the SD Card
- 4. Run PageKite
- 4.1. Installing PageKite
- 4.2. Configuring PageKite
- 4.3. Connecting to Your Pi With PageKite
- 4.4. Warning!!! Here Be Dragons!
- 5. Other Approaches
1. Introduction: Catch-22
There's a familiar problem when you work with a Pi without a monitor — how to log in?
You've plugged your Pi onto a perfectly ethernet connection, the operating system has worked its magic and the LINK LED is merrily blinking away to tell you that there's traffic on the wire... but you don't know the address! (Or: you've got a USB WiFi dongle, and an available network, but your Pi doesn't know the passphrase.)
You need to IP address so you can log in (e.g. via ssh), but you need to log in to find out the IP address. Catch-22!
This page discusses various solutions to the problem:
- using the Pi'd status LED to blink the IP number
- writing the IP address to file on the SD card
- using the PageKite proxy system
We'll also note some other approaches at the end (e.g. sending an SMS).
The rest of this section describes how to find the Pi's IP address which will then be used by all the other methods, and also how to get your Pi to connect to a WiFi network without logging in.
1.1. Getting the IP Address via ifconfig
All methods for informing you of the IP address require a way to get that address in the first place. For this we'll use the ifconfig command, which stands for "interface configuration", the interfaces in question being the wired and wireless network ports on the Pi.
If you open a terminal on your Pi and run ifconfig you'll see output something like this:
eth0      Link encap:Ethernet  HWaddr b8:00:eb:73:00:9a
          UP BROADCAST MULTICAST  MTU:1500  Metric:1
          RX packets:0 errors:0 dropped:0 overruns:0 frame:0
          TX packets:0 errors:0 dropped:0 overruns:0 carrier:0
          collisions:0 txqueuelen:1000
          RX bytes:0 (0.0 B)  TX bytes:0 (0.0 B)

lo        Link encap:Local Loopback
          inet addr:127.0.0.1  Mask:255.0.0.0
          UP LOOPBACK RUNNING  MTU:16436  Metric:1
          RX packets:75 errors:0 dropped:0 overruns:0 frame:0
          TX packets:75 errors:0 dropped:0 overruns:0 carrier:0
          collisions:0 txqueuelen:0
          RX bytes:10493 (10.2 KiB)  TX bytes:10493 (10.2 KiB)

wlan0     Link encap:Ethernet  HWaddr 00:0f:00:38:00:8a
          inet addr:192.168.68.189  Bcast:192.168.68.255  Mask:255.255.255.0
          UP BROADCAST RUNNING MULTICAST  MTU:1500  Metric:1
          RX packets:856 errors:0 dropped:0 overruns:0 frame:0
          TX packets:499 errors:0 dropped:0 overruns:0 carrier:0
          collisions:0 txqueuelen:1000
          RX bytes:122622 (119.7 KiB)  TX bytes:58536 (57.1 KiB)
This describes three network interfaces:
- the wired link, eth0
- the "loopback" link, which is a virtual interface pointing back at the local machine (or localhost)
- the wireless link, if one is connected, wlan0
Each link may (or may not) have an IP address. In the above, the wired link is not connected so has no address. The loopback link always has the same address — 127.0.0.1, and is not interesting in this context as we can't use that address for logging in to our Pi. So in this case we're interested in the IP address given for wlan0, which is 192.168.68.189.
Here's a shell command which takes the output of ifconfig, picks out the first non-local IP address and splits it into it's four number groups:
MYIP=`ifconfig |grep -v 127.0.0.1 |grep 'addr:' | head -1 |\
  sed -e 's,.*addr:,,' -e 's, .*,,' -e 's,\., ,g'`
echo $MYIP
The two greps filter out
- the localhost address (using the -v flag to exclude all matching lines), and then
- all lines that don't match the "addr:" pattern
We use head -1 to select only the first address. Finally, the sed (stream editor) command removes the "addr:" part of the line, then everything after the first space, and then changes all the "."s to spaces.
The output will be something like 192 168 68 189. Now let's see how we can communicate that to the Pi's user.
1.2. Connecting to WiFi
Another conundrum hits us when we've got a WiFi dongle connected to the Pi and there's a network available, but no way to tell the Pi about the network SSID and passphrase.
The solution is to take the SD card to another machine, mount the filesystem and add the network details to the file /etc/wpa_supplicant/wpa_supplicant.conf. The simple cases look like this (for WPA):
network={
  ssid="MyWifi"
  psk="1133557799"
  key_mgmt=WPA-PSK
}
...or this (for WEP):
network={
  ssid="MyOtherWifi"
  key_mgmt=NONE
  auth_alg=OPEN
  wep_key0=2244668800
}
One very good policy, if you have a phone or a laptop that can create a wifi
hotspot, is to put those details into your Pi's WPA config — then whenever
you need to log into the Pi you can fire up your phone's network and your Pi
will connect automagically. (A handy command to see what the connection is
getting up to when logged in is this: wpa_cli status.)
Now let's look at how to get the IP from the Pi without logging in.
2. Blink the Status LED
The Pi has a set of LEDs in one corner of the board that convey various messages:
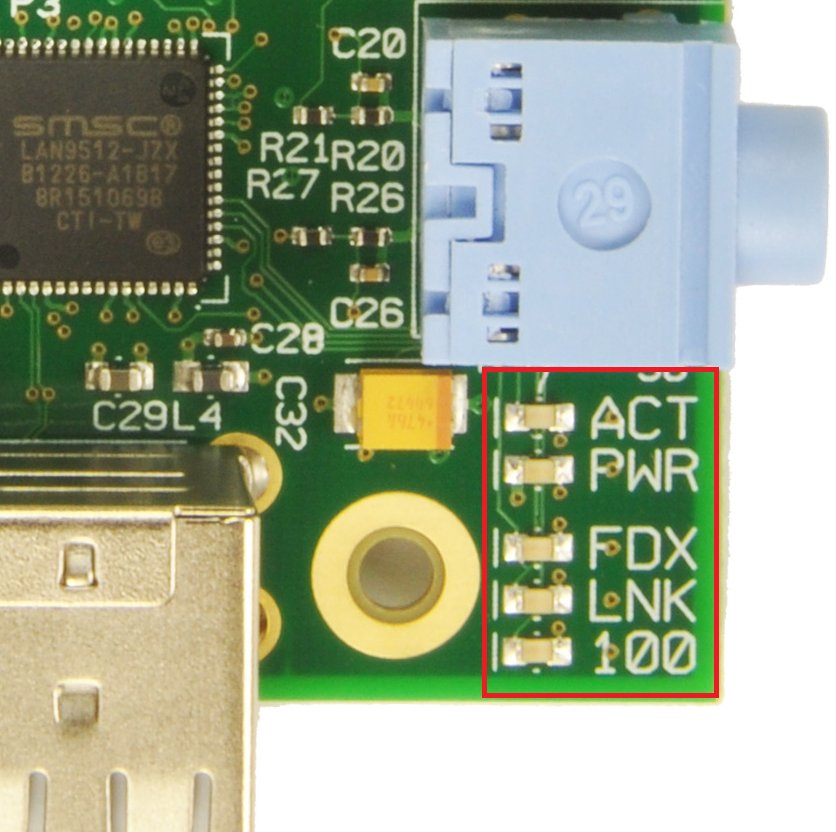
(Image from:
RPIBlog.)
One good option for IP address discovery is to make the status LED (which is marked either "ACT" — as in the image above — or "OK" depending on which revision you have). The question then, is "who's going to run the code to blink the LED?" I've written a daemon to do this — the code is available on GitHub, and described in the rest of this section.
To access the Pi's status LED, we use the /sys/class tree, which makes the hardware available as leds/led0/brightness. We can define functions to turn the LED on and off like this1:
  LED=/sys/class/leds/led0/brightness

  bright() { echo 1 >$LED; }
  dark()   { echo 0 >$LED; }
And here are a couple of utility functions to pause for various durations:
  pause() { dark; sleep 2.5; }
  shortpause() { dark; sleep 1; }
We'll use these functions to blink the IP address, along with three
conventions:
- each IP number group is separated from the rest by a period of rapid blinking (which also signals the start and end of the whole sequence)
- each digit is blinked as a series of bright periods (of about a third of a second each)
- when we have a zero we represent it as ten (so that we can distinguish zero from the pauses between digits)
These conventions are implemented like this:
  rapid()  {                                # rapid blinking function
    i=0
    while [ $i -lt 15 ]                     # 15 rapid blinks
    do
      bright; sleep 0.05; dark; sleep 0.05  # 5 hundredths of a second
      i=`expr $i + 1`                       # increment the loop index
    done
  }

  showdigit() {                             # individual digit function
    d=$1
    [ $d = 0 ] && d=10                      # show "0" as "10"
    for((b=0; b<$d; b++))                   # loop from 0 to the digit value
    do
      bright; sleep 0.3; dark; sleep 0.4
    done
  }
Putting it all together, here's the function to blink the whole IP address:
  blink() {
    rapid; rapid                            # blink rapidly to start with

    for block in $1 $2 $3 $4                # cycle through each address block
    do
      numdigits=${#block}
      for ((i=0; i < $numdigits; i++))      # for each digit
      do
        pause
        showdigit ${block:$i:1}             # call showdigit on 1 character
      done

      shortpause; rapid
      shift
    done
  }
We then call the function like this (using the code from the
section on finding the IP):
  MYIP=`ifconfig |grep -v 127.0.0.1 |grep 'addr:' | head -1 |\
    sed -e 's,.*addr:,,' -e 's, .*,,' -e 's,\., ,g'`
  blink $MYIP
The complete code
is here.
2.1. Installing and Running
There's one final problem, though — who is going to call this program if I can't log in?! The answer is a daemon, a system-level service which gets run during operating system startup. We implemented one of these for our MoPi battery monitor, and we've done the same for BlinkIP. You can install it from our Ubuntu-hosted package archive — see the installation guide for details.
3. Write a File to the SD Card
Another option is to have the IP address written to a file on your Pi's SD card, then to shutdown and read the file on another device (if you have one handy with a card reader). The BlinkIP code described in the previous section also does this for you.
It isn't quite as reliable as the other methods, because it is possible that the IP address will change when you put the card back in the Pi and boot up again.
BlinkIP puts the IP data into /home/pi/.blink-ip.txt by default.
4. Run PageKite
Here be dragons! Please read this warning first!!!.
Now here's a thing — it turns out that using the miraculous capabilities of the Secure Shell (SSH) and the fiendishly clever PageKite system we can pretty much avoid all this blinking business and make it easy and convenient to log in to the Pi from anywhere, any time — and Santa Claus will pop round to give you an enormous present and a kiss on the nose every couple of days2.
This miracle is brought to you by a couple of idealistic Icelandic folk who hold the unfashionable opinion that it might be a bad idea for Facebook, Google and the like to pipe all our data wholesale into Mordor so that spotty young spies at the NSA or GCHQ can use it to stalk their chosen love interest or persecute those whose political opinions they disagree with.
A big problem with moving away from the cloud services of the mega-corps is that much of the time most of the machines we own are behind firewalls, network address translation (NAT) gateways and the like, and so we can't easily serve files or make connections. PageKite solves this problem by providing a secure proxy service. A tiny amount of data is stored on a server in Iceland3 (which now has some of the best Internet legal protection in the world, incidentally) — the rest of it stays safe on your own machines, and the spies just have to pick their noses and twiddle their thumbs instead.
I first used PageKite to get access to the flood alarm in my basement, which is behind my home router and a NAT. It allows me to log into that Pi by doing:
ssh -l pi flooding.pagekite.meVery nice.
PageKite isn't that easy to set up though — I'll finish this section with a short guide to how I got SSH login to work.
First, head on over to https://pagekite.net/ and get a kite (they operate a "pay as you like" arrangement). We'll refer to your kite as MY_KITE_NAME below.
4.1. Installing PageKite
To install the system on your Pi, run these commands in a terminal:
  sudo su
  echo deb http://pagekite.net/pk/deb/ pagekite main | tee -a /etc/apt/sources.list
  apt-key adv --recv-keys --keyserver keys.gnupg.net AED248B1C7B2CAC3
  apt-get update
  apt-get install pagekite
You also need the netcat, or nc command installed if it isn't already. This is a standard gizmo, so you can install it with:
sudo apt-get install netcat
4.2. Configuring PageKite
To configure the system for SSH and HTTP access, first go to https://pagekite.net/ create MY_KITE_NAME and copy the "secret" (we'll call this YOURSECRET below). Then run these commands in a terminal (on the Pi):
  pagekite --add 22 ssh:MY_KITE_NAME.pagekite.me
  pagekite --add 80 MY_KITE_NAME.pagekite.me
Edit /etc/pagekite.d/10_account.rc and:
- replace "NAME.pagekite.me" with MY_KITE_NAME
- replace "YOURSECRET" with the shared secret (available at https://pagekite.net/home/)
- remove the line "abort_not_configured" and the comment above it.
Now rename the file /etc/pagekite.d/80_sshd.rc.sample to 80_sshd.rc, and rename /etc/pagekite.d/80_httpd.rc.sample to /etc/pagekite.d/80_httpd.rc. Then restart the service like this:
sudo service pagekite restartFinally, add this to the file ~/.ssh/config on your client, not the Pi (i.e. on the machine that you want to connect from):
  Host *.pagekite.me
    CheckHostIP no
    ProxyCommand /bin/nc -X connect -x %h:443 %h %p
4.3. Connecting to Your Pi With PageKite
To connect:
ssh -l pi MY_KITE_NAME.pagekite.meIf you hit trouble, or you want to learn more about how it works, these are some good places to start reading:
- https://pagekite.net/wiki/Howto/GNULinux/DebianPackage/
- https://pagekite.net/wiki/Howto/GNULinux/ConfigureYourSystem/
- https://pagekite.net/wiki/Howto/SshOverPageKite/
Good luck!
4.4. Warning!!! Here Be Dragons!
We're using PageKite to make a remote service available from our Pi — this means that a potential intruder can get in!
Don't ignore this: there are lots and lots and lots of people (and robots) out there actively trying to subvert systems, and if you make an insecure machine visible out there in the big bad world you are very likely to be hacked, with all kinds of nasty consequences.
So, at the very least, make a strong password on your Pi: use 10 or 20 characters, upper case and lower case, punctuation and symbols. Even better, set up your SSH server to only allow key-based login (do set up your key before doing this!).
Linux is probably the most secure system in the world — but nothing is secure if the user doesn't set things up properly.
You have been warned.
5. Other Approaches
Robbie Wiggins has a nice script to send a text message with the IP address on boot up.
It should also be very possible to Tweet your IP, e.g. using the programmatic Twitter code in our Notifications material.
Finally, if you're psychic, you don't need any of these methods — just put your forehead close to the ethernet cable and listen for the magic numbers.
Footnotes
- All the code here is in the Bash shell, a standard piece of free software kit on the Pi and many other systems.
- Ok, I'm exaggerating a little about the last bit.
- You can also run a PageKite server on your own machine if you like, though this is quite an advanced topic.
